Easy vegan chocolate fudge
The holidays come with a long to-do list, and homemade treats can feel like one more thing. This easy vegan chocolate fudge is the opposite. It takes about 10 minutes of hands-on time, there’s no candy thermometer, and the refrigerator does most of the work.
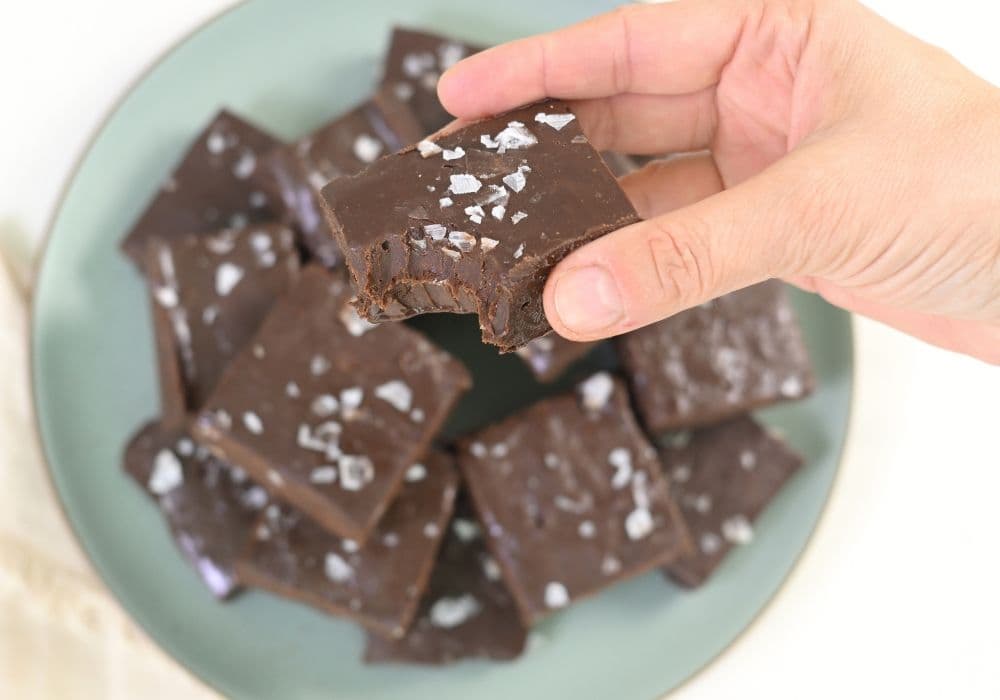
Just melt the chocolate chips, whisk in sweetened condensed coconut milk and a little vanilla, and pour it into a pan. Sprinkle flaky sea salt on top, and a few hours later, you’ll have 16 thick, glossy squares that are rich, creamy, and melt in your mouth. Stack them in a tin, tuck a few into a gift box, or add them to a cookie tray.
Preparation Time: 10 minutes (plus 2 hours 30 minutes to chill)Ingredients
Calories:
420
Protein:
2
g
- 3 (9-ounce) bags dairy-free dark or semi-sweet chocolate chips
- 3 (11.25-ounce) cans sweetened condensed coconut milk
- 1 tablespoon pure vanilla extract
- flaky sea salt, for topping
- coconut oil, for greasing
Preparation
- Prep the pan: Line an 8×8-inch pan with parchment paper, leaving some extra hanging over two sides so you can lift the fudge out later. Lightly grease the parchment with coconut oil.
- Set up a double boiler: Fill a small pot with about 2 inches of water and bring it to a gentle simmer. Set a stainless steel bowl that’s larger than the pot on top, so it rests on the rim without touching the water.
- Melt the chocolate: Add the chocolate chips to the bowl and stir gently for about 5 minutes, until completely melted and smooth. Make sure the bowl and spatula are completely dry, since even a drop of water can make the chocolate grainy.
- Whisk: Remove the bowl from the heat. Add the condensed coconut milk and vanilla, and whisk until smooth, thick, and glossy. It thickens quickly, so move on to the next step right away.
- Pour and top: Pour the fudge into the pan and smooth the top with a spatula. Sprinkle with flaky sea salt while it’s still soft, so it sticks.
- Chill: Refrigerate for 2 hours, then move the pan to the freezer for 30 minutes, until firm.
- Cut: Lift the fudge out using the parchment. Run a sharp knife under hot water, dry it, and cut the fudge into 16 squares (4 by 4), wiping the knife between cuts.
Tips
- Use parchment, not wax paper: Wax paper sticks to chocolate and is hard to peel off.
- Keep the heat low: Chocolate burns easily, so keep the water at a gentle simmer and stir often.
- Keep water out of the bowl: Even a drop of water or steam can make chocolate thick and grainy, so make sure your bowl and spatula are completely dry.
- Choose your chocolate: Dark chocolate chips give the fudge a deep, not-too-sweet flavor. Semisweet chips work too if you prefer a sweeter fudge.
- Cut it smaller: These squares are thick and rich. For bite-size pieces to share or give as gifts, cut each square in half.
- Make it your own: Stir in chopped walnuts or pecans, swirl in a spoonful of peanut butter, or add a few drops of peppermint extract for the holidays.
- Too soft to cut? Give it another 15 to 20 minutes in the freezer before cutting.
- Wrap it as a gift: Stack a few squares on parchment paper, fold it into a small package, and tie it with a red ribbon or baker’s twine. A small tin or a parchment-lined box works well, too. Keep the gifts in the refrigerator until you hand them out, since the fudge softens at room temperature.
- Make ahead: The fudge keeps for up to 2 weeks, so it’s a great treat to make before the holiday rush.
- Storage: Refrigerate in an airtight container for up to 2 weeks, with parchment between the layers so the squares don’t stick together. Serve chilled, or let it sit for 5 to 10 minutes before serving.
- Freezing: Freeze for up to 2 months.
Try Plant-based Today
Sign up to get great tips and recipes